

Kit Components
| No. | Item | Specifications(48T/96T) | Storage |
| E001 | ELISA Microplate(Dismountable) | 8×6/8×12 | 2-8°C/-20°C |
| E002 | Lyophilized Standard | 1vial/2vial | 2-8°C/-20°C |
| E039 | Sample Dilution Buffer | 10ml/20ml | 2-8°C |
| E003 | Biotin-labeled Antibody(Concentrated) | 60ul/120ul | 2-8°C(Avoid Direct Light) |
| E040 | Antibody Dilution Buffer | 5ml/10ml | 2-8°C |
| E034 | HRP-Streptavidin Conjugate(SABC) | 60ul/120ul | 2-8°C(Avoid Direct Light) |
| E049 | SABC Dilution Buffer | 5ml/10ml | 2-8°C |
| E024 | TMB Substrate | 5ml/10ml | 2-8°C(Avoid Direct Light) |
| E026 | Stop Solution | 5ml/10ml | 2-8°C |
| E038 | Wash Buffer(25X) | 15ml/30ml | 2-8°C |
| E006 | Plate Sealer | 3/5pieces | |
| E007 | Product Description | 1copy | |
| E008 | Preprocess Agent A | 1.5ml×1 vial/1.5ml×2 vial | 2-8°C |
| E009 | Preprocess Agent B | 1.5ml×1 vial/1.5ml×2 vial | 2-8°C |
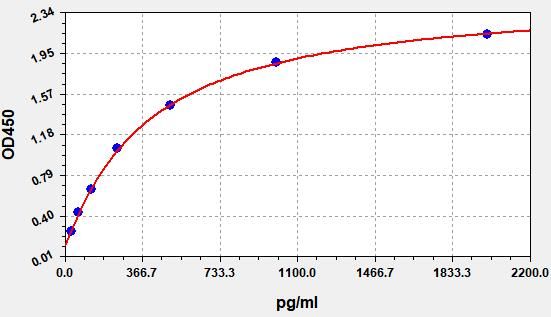
Typical Data & Standard Curve
Results of a typical standard operation of a TGF-β1 ELISA Kit are listed below. This standard curve was generated at our lab for demonstration purpose only. Users shall obtain standard curve as per experiment by themselves. (N/A=not applicable)
| STD.(pg/ml) | OD-1 | OD-2 | Average | Corrected |
| 0 | 0.104 | 0.108 | 0.106 | 0 |
| 31.25 | 0.156 | 0.16 | 0.158 | 0.052 |
| 62.5 | 0.299 | 0.307 | 0.303 | 0.197 |
| 125 | 0.45 | 0.464 | 0.457 | 0.351 |
| 250 | 0.849 | 0.873 | 0.861 | 0.755 |
| 500 | 1.269 | 1.305 | 1.287 | 1.181 |
| 1000 | 1.967 | 2.025 | 1.996 | 1.89 |
| 2000 | 2.844 | 2.926 | 2.885 | 2.779 |
Specificity
This assay has high sensitivity and excellent specificity for detection of TGF-β1. No significant cross-reactivity or interference between TGF-β1 and analogues was observed.
Note: Limited by current skills and knowledge, it is difficult for us to complete the cross-reactivity detection between TGF-β1 and all the analogues, therefore, cross reaction may still exist.
Recovery
Matrices listed below were spiked with certain level of TGF-β1 and the recovery rates were calculated by comparing the measured value to the expected amount of TGF-β1 in samples.
| Matrix | Recovery Range (%) | Average (%) |
| Serum(n=5) | 85-103 | 92 |
| EDTA Plasma(n=5) | 88-104 | 97 |
| Heparin Plasma(n=5) | 86-103 | 95 |
Linearity
The linearity of the kit was assayed by testing samples spiked with appropriate concentration of TGF-β1 and their serial dilutions. The results were demonstrated by percentage of calculated concentration to the expectation.
| Sample | 1:2 | 1:4 | 1:8 |
| Serum(n=5) | 87-98% | 86-100% | 85-96% |
| EDTA Plasma(n=5) | 84-100% | 88-97% | 88-101% |
| Heparin Plasma(n=5) | 82-98% | 80-98% | 87-98% |
Precision
Intra-Assay: CV<8%
Inter-Assay: CV<10%
Stability
The stability of ELISA kit is determined by the loss rate of activity. The loss rate of this kit is less than 10% within the expiration date under appropriate storage condition.
| Standard(n=5) | 37°C for 1 month | 2-8°C for 6 months |
| Average (%) | 80 | 95-100 |
To minimize extra influence on performance, operation procedures and lab conditions, especially room temperature, air humidity, incubator temperature should be strictly controlled. It is strongly suggested that the same operator performs the whole assay from the beginning to the end.
Principle of the Assay
This kit was based on sandwich enzyme-linked immune-sorbent assay technology. Capture antibody was pre-coated onto 96-well plates. And the biotin conjugated antibody was used as detection antibodies. The standards, test samples and biotin conjugated detection antibody were added to the wells subsequently, and washed with wash buffer. HRP-Streptavidin was added and unbound conjugates were washed away with wash buffer. TMB substrates were used to visualize HRP enzymatic reaction. TMB was catalyzed by HRP to produce a blue color product that changed into yellow after adding acidic stop solution. The density of yellow is proportional to the target amount of sample captured in plate. Read the O.D. absorbance at 450nm in a microplate reader, and then the concentration of target can be calculated.
Precautions
- To inspect the validity of experiment operation and the appropriateness of sample dilution proportion, pilot experiment using standards and a small number of samples is recommended.
- After opening and before using, keep plate dry.
- Before using the kit, spin tubes and bring down all components to the bottom of tubes.
- Storage TMB reagents avoid light.
- Washing process is very important, not fully wash easily cause a false positive and high background.
- Duplicate well assay is recommended for both standard and sample testing.
- Don’t let microplate dry at the assay, for dry plate will inactivate active components on plate.
- Don’t reuse tips and tubes to avoid cross contamination.
- Please do not mix the reagents in different kits of our company. Do not mix reagents from other manufacturers.
- To ensure accurate results, proper adhesion of plate sealers during incubation steps is necessary.
Material Required but Not Supplied
- Microplate reader (wavelength:450nm)
- 37°C incubator
- Automated plate washer
- Precision single and multi-channel pipette and disposable tips
- Clean tubes and Eppendorf tubes
Washing
Manual: Discard the solution in the plate without touching the side walls. Clap the plate on absorbent filter papers or other absorbent material. Fill each well completely with 350ul wash buffer and soak for 1 to 2 minutes, then aspirate contents from the plate, and clap the plate on absorbent filter papers or other absorbent material.
Automatic: Aspirate all wells, and then wash plate with 350ul wash buffer. After the final wash, invert plate, and clap the plate on absorbent filter papers or other absorbent material. It is recommended that the washer shall be set for soaking 1 minute. (Note: set the height of the needles; be sure the fluid can be sipped up completely)
Sample Collection and Storage (universal)
- Serum: Place whole blood sample at room temperature for 2 hours or put it at 2-8°C overnight and centrifugation for 20 minutes at approximately 1000×g, Collect the supernatant and carry out the assay immediately. Blood collection tubes should be disposable, non-pyrogenic, and non-endotoxin.
- Plasma: Collect plasma using EDTA-Na2 or heparin as an anticoagulant. Centrifuge samples for 15 minutes at 1000×g at 2-8°C within 30 minutes of collection. Collect the supernatant and carry out the assay immediately. Avoid hemolysis, high cholesterol samples.
- Tissue Homogenates: As hemolysis blood has relation to assay result, it is necessary to remove residual blood by washing tissue with pre-cooling PBS buffer (0.01M, pH=7.4). Mince tissue after weighing it and get it homogenized in PBS (the volume depends on the weight of the tissue. Normal, 9mL PBS would be appropriate to 1 gram tissue pieces. Some protease inhibitors are recommended to add into the PBS) with a glass homogenizer on ice. To further break the cells, you can sonicate the suspension with an ultrasonic cell disrupter or subject it to freeze-thaw cycles. The homogenates are then centrifuged for 5 minutes at 5000×g to get the supernatant. The total protein concentration was determined by BCA kit and the total protein concentration of each pore sample should not exceed 0.3mg.
- Adherent and Suspension Cell Culture: Use three T25 flasks or one T75 flask for cell culture, the number of cells (1×10⁷);
- 1. Suspension cell: centrifuge at 2500 rpm at 2-8℃ for 5 minutes; collect clarified cell culture supernatant;
- Adherent cell: collect supernatant directly; centrifuge at 2500 rpm at 2-8℃ for 5 minutes; collect clarified cell culture supernatant for immediate detection or store it separately at -80℃.
- Cell Lysate Preparation: Two types of cell lysates are specified below.
- Suspension Cell Lysate:Centrifuge at 2500 rpm at 2-8℃ for 5 minutes; Then add pre-cooling PBS into collected cell and gently mix. Recollect cell by repeating centrifugation. Add 0.5-1ml RIPA lysis buffer (NP-40 lysis buffer or Triton X-100 surfactant is not recommended due to the interfering with antigen-antibody reaction). Add suitable protease inhibitor (e.g. PMSF, working concentration: 1mmol/L). Lyse the cell on ice for 30min-1h. During lysate process, use the tip for pipetting or intermittently shake the centrifugal tube to completely lyse the protein. Alternatively, cells are subject to fragmentation by ultrasonic cell disruptor (300W, 3~5 s/time, 30s intervals, four-five times) or ultrasonic generator (14μm for 30s ). At the end of lysate or ultrasonic disruption, centrifuge at 10000rpm at 2-8℃ for 10 minutes. Then, the supernatant is added into EP tube and stored at -80℃.
- Adherent Cell Lysate: Absorb supernatant and add pre-cooling PBS once. Then, add 0.5-1ml RIPA lysis buffer (NP-40 lysis buffer or Triton X-100 surfactant is not recommended due to the interfering with antigen-antibody reaction). Add the suitable protease inhibitor (e.g. PMSF, working concentration: 1mmol/L). Scrape adherent cell gently with a cell scraper. Add the cell suspension into centrifugal tube. Lyse the cell on ice for 30min-1h. During lysate process, use the tip for pipetting or intermittently shake the centrifugal tube to completely lyse the protein. Alternatively, cells are subject to fragmentation by ultrasonic generator (14μm for 30s ) or ultrasonic cell disruptor (300W, 3~5 s/time, 30s intervals, four-five times). At the end of lysate/ultrasonic disruption, centrifuge at 10000rpm at 2-8℃ for 10 minutes. Then, the supernatant is added into EP tube and stored at -80℃.
- Other Biological Fluids: Centrifuge samples for 20 minutes at 1000×g at 2-8°C. Collect supernatant and carry out the assay immediately.
Note: Samples used within 5 days can be stored at 2-8°C; otherwise, they must be stored at -20°C or -80°C or liquid nitrogen to avoid loss of biological activity and contamination. Avoid multiple freeze-thaw cycles. Hemolytic samples are not suitable for this test.
Sample Pre-process
In order to exposed the binding site of antigen, we suggest preprocess the sample.
- Serum/Plasma: Add 20ul of Preprocess Agent A to 40ul samples, mix well, incubate 10 minutes at room temperature. Neutralize the acidified sample by adding 20ul of Preprocess Agent B, mix well. The matrix components in the sample will affect the test results, which it need to be diluted at least 1/2 with Sample/Standard Dilution Buffer before testing!
- Cell Culture Supernatant: Add 20ul of Preprocess Agent A to 100ul samples, mix well, incubate 10 minutes at room temperature. Neutralize the acidified sample by adding 20ul of Preprocess Agent B, mix well. At last, add 60ul Sample dilution buffer, mix well and test. Note: Sample is diluted 2 times.
Sample Dilution
The user should estimate the concentration of target protein in the test sample, and select a proper dilution factor to make the diluted target protein concentration fall in the optimal detection range of the kit. Dilute the sample with the provided dilution buffer, and several trials may be necessary. The test sample must be well mixed with the dilution buffer. And also standard curves and sample should be making in pre-experiment. If samples with very high concentrations, dilute samples with PBS first and then dilute the samples with Sample Dilution.
The matrix components in the sample will affect the test results, which it need to be diluted at least 1/2 with Sample Dilution Buffer before testing!
Reagent Preparation and Storage
Bring all reagents and samples to room temperature for 20 minutes before use.
1, Wash Buffer:
If crystals have formed in the concentrate, you can warm it with 40°C water bath (Heating temperature should not exceed 50°C) and mix it gently until the crystals have completely been dissolved. The solution should be cooled to room temperature before use.
Dilute 30ml (15ml for 48T) Concentrated Wash Buffer to 750ml (375ml for 48T) Wash Buffer with deionized or distilled water (The recommended resistivity of deionized or distilled water is 18MΩ). Put unused solution back at 2-8°C.
2, Standards:
1). Add 1 ml Sample Dilution Buffer into one Standard tube (labeled as zero tube), keep the tube at room temperature for 10 minutes and mix them thoroughly.
Note: If the standard tube concentration higher than the range of the kit,please dilute it and labeled as zero tube.
2). Label 7 EP tubes with 1/2, 1/4, 1/8, 1/16, 1/32, 1/64 and blank respectively. Add 0.3ml of the Sample Dilution Buffer into each tube. Add 0.3ml of the above Standard solution (from zero tube) into 1st tube and mix them thoroughly. Transfer 0.3ml from 1st tube to 2nd tube and mix them thoroughly. Transfer 0.3ml from 2nd tube to 3rd tube and mix them thoroughly, and so on. Sample Dilution Buffer was used for the blank control.
Note: It is best to use Standard Solutions within 2 hours.
3, Preparation of Biotin-labeled Antibody Working Solution:
Prepare it within 1 hour before experiment.
1)Calculate required total volume of the working solution: 0.1ml/well × quantity of wells. (Allow 0.1-0.2ml more than the total volume.)
2)Dilute the Biotin-detection antibody with Antibody Dilution Buffer at 1:100 and mix them thoroughly. (i.e. Add 1ul Biotin-labeled antibody into 99ul Antibody Dilution Buffer.)
4, Preparation of HRP-Streptavidin Conjugate (SABC) Working Solution:
Prepare it within 30 minutes before experiment.
1)Calculate required total volume of the working solution: 0.1ml/well × quantity of wells. (Allow 0.1-0.2ml more than the total volume.)
2)Dilute the SABC with SABC Dilution Buffer at 1:100 and mix them thoroughly. (i.e. Add 1ul of SABC into 99ul of SABC Dilution Buffer.)
Assay Procedure
When diluting samples and reagents, they must be mixed completely and evenly. Before adding TMB into wells, equilibrate TMB Substrate for 30 minutes at 37°C. It is recommended to plot a standard curve for each test.
- Set standard, test samples (diluted at least 1/2 with Sample Dilution Buffer), control (blank) wells on the pre-coated plate respectively, and then, records their positions. It is recommended to measure each standard and sample in duplicate.
- Prepare Standards: Aliquot 100ul of zero tube, 1sttube, 2ndtube, 3rdtube, 4thtube, 5thtube, 6thtube and Sample Dilution Buffer (blank) into the standard wells.
- Add Samples: Add 100ul of properly diluted sample into test sample wells.
- Incubate: Seal the plate with a cover and incubate at 37°C for 90 minutes.
- Wash: Remove the cover and discard the plate content, and wash plate 2 times with Wash Buffer. Do NOT let the wells dry completely at any time.
- Biotin-labeled Antibody: Add 100ul Biotin-labeled antibody working solution into above wells (standard, test sample and blank wells). Add the solution at the bottom of each well without touching the sidewall, cover the plate and incubate at 37°C for 60 minutes.
- Wash: Remove the cover, and wash plate 3 times with Wash Buffer, and let the Wash Buffer stay in the wells for 1-2 minutes each time.
- HRP-Streptavidin Conjugate (SABC): Add 100ul of SABC Working Solution into each well, cover the plate and incubate at 37°C for 30 minutes.
- Wash: Remove the cover and wash plate 5 times with Wash Buffer, and let the wash buffer stay in the wells for 1-2 minutes each time.
- TMB Substrate: Add 90ul TMB Substrate into each well, cover the plate and incubate at 37°C in dark within 10-20 minutes. (Note: The reaction time can be shortened or extended according to the actual color change, but not more than 30 minutes. You can terminate the reaction when apparent gradient appeared in standard wells.)
- Stop: Add 50ul Stop Solution into each well. The color will turn yellow immediately. The adding order of Stop Solution should be as the same as the TMB Substrate Solution.
- OD Measurement: Read the O.D. absorbance at 450nm in Microplate Reader immediately after adding the stop solution.
Regarding calculation, (the relative O.D.450) = (the O.D.450 of each well) – (the O.D.450 of blank well). The standard curve can be plotted as the relative O.D.450 of each standard solution (Y) vs. the respective concentration of the standard solution (X). The target concentration of the samples can be interpolated from the standard curve. It is recommended to use some professional software to do this calculation, such as Curve Expert 1.3 or 1.4.
Note: If the samples measured were diluted, multiply the dilution factor to the concentrations from interpolation to obtain the concentration before dilution.
Summary
Step1: Add 100ul standard or sample to each well and incubate for 90 minutes at 37°C.
Wash step: Aspirate and wash plates 2 times.
Step2: Add 100ul Biotin-labeled antibody working solution to each well and incubate for 60 minutes at 37°C.
Wash step: Aspirate and wash plates 3 times.
Step3: Add 100ul SABC Working Solution into each well and incubate for 30 minutes at 37°C.
Wash step: Aspirate and wash plates 5 times.
Step4: Add 90ul TMB Substrate Solution. Incubate 10-20 minutes at 37°C.
Step5: Add 50ul Stop Solution. Read at 450nm immediately and calculation.